A parallelized ray tracer in the browser
April 20, 2016
This semester, I got a chance to write a ray tracer for my parallel programming class. I took this class because I thought it’d be fun to learn about parallel programming constructs and practices, but I didn’t think that I’d end up writing a ray tracer for a class assignment. Although I’ve never done any computer graphics programming before, I thought this assignment was neat since it gave me an idea of how computers can generate images and I ended up with a very visual result of my work. So, I wrote this post to consolidate what I learnt on ray tracing and doing it in the browser using the GPU, with help from GPU.js.
Since I’ve never had any direct experience with programming computer graphics before, I started this assignment by trying to understand what ray tracing is and how it works. In doing so, I found two particularly useful articles. The first, Ray Tracing: Graphics for the Masses, is a very readable and useful introduction to ray tracing’s basic concepts and terminology. The second, a narrative-style tutorial that implements a ray tracer in JavaScript, focuses more on implementing an actual ray tracer in JavaScript. It was especially helpful in demonstrating how to generate rays from a camera.
How ray tracing works
Ray tracing is a method for generating realistic looking images based on tracing the path of light rays through a “world”, i.e. the scene in which we would like to generate these images. It mimics the way in which light enters a camera or an eye to form images and simulates that process to construct images. Imagine you’re shooting a movie. You’d have a camera, lights, and things in your set. When recording your movie, your camera records whatever light rays that enter its viewpoint. In ray tracing, you have the opposite effect for the light rays. Instead of calculating the rays based on light sources in the scene, we generate the rays out of the camera so that we only compute the colours of the rays that we know will be inside the picture. This way, we don’t waste resources computing rays that will never be part of the image.
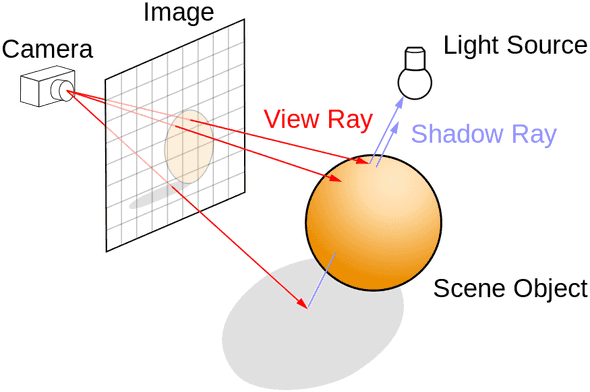
An illustration from Wikipedia on how raytracing works.
Ray tracing, especially when compared to other techniques for generating images, allows for realistic rendering of images since we can naturally mimic properties of light—such as absorption, reflection, and refraction—when it hits a surface. As a result, ray tracing is computationally costly and hence typically suited to situations where we can pre-render the images ahead of time. But, since each ray trace, and correspondingly its pixel colour on the screen can be determined independently, determining the colours for each pixel and hence generating the image can be done in parallel and hence makes this problem particularly suited for the GPU. This is where GPU.js comes in.
Parallelizing ray traces using GPU.js
GPU.js is an in-browser transpiler that transpiles a subset of JavaScript into OpenGL Shading Language (GLSL). Shading languages are graphics programming languages for characterizing surfaces, volume, and colour. In GPU.js, the GLSL produced uses WebGL—a JavaScript API for rendering interactive 3D computer graphics that’s supported in most modern browsers—to access the GPU. Hence, GPU.js allows the programmer to write in JavaScript and perform parallel computations on the GPU and fall back to JavaScript when the GPU is unavailable. This is very neat since the programmer now doesn’t need to know GLSL to use it and can write once and use it on both CPU and GPU.
GPU.js has been rather apt for this task. You create a kernel in
graphical mode and pass in a function that computes the colour for
each pixel on a canvas that the kernel returns. This can be as simple
as calling this.color (r, g, b) to set the pixel colours, using RGB
values, that corresponds to the x and y coordinates that each
thread is assigned to.
let gpu = new GPU();
let kernel = gpu.createKernel(
  function () {
    /* This pixel's coordinates on the canvas */
    let x = this.thread.x;
    let y = this.thread.y;

    /* RGB values */
    this.color(0, 0, 1);
  },
  {
    /* Options */
    dimensions: [800, 600],
    graphical: false,
    mode: "gpu",
  }
);

let canvas = kernel.getCanvas();
document.body.appendChild(canvas);
A simple GPU.js kernel that creates a 800 x 600 blue canvas using the GPU and inserts it into a web page's body.
However, there are some caveats. GPU.js is still in its early stages
of development and so only supports a limited subset of JavaScript. It
does not support passing in or returning arrays in kernel functions
and does not support recursion (since GLSL does not support
recursion). Hence, it took a bit more coding than usual to get the ray
tracer up and running, especially since the trace () function does a
number of vector operations and is typically used recursively. I
worked around this by making trace () iterative and writing
functions such unitVectorX (Vx, Vy, Vz) to compute the x value for
a vector V’s unit vector, and similar functions unitVectorY (Vx,
Vy, Vz) and unitVectorZ (Vx, Vy, Vz) to return its y and z
values. It was a tiny bit annoying, but necessary.
Results
It took a number of nights working on this and getting used to GPU.js’ quirks, but I’m very pleased with the end product. It was especially gratifying to be able to see the visible differences when implementing specific light tracing properties such as Lambertian reflectance and specular reflection—giving a surface a “matte” appearance and a mirror-like reflection respectively. I also like that the ray tracer runs in a browser, which allowed me to make an interactive ray tracer online. I thought Jingwen did a really great job in making his ray tracer more interactive (you can move the camera and dynamically add more spheres in it). Additionally, when toggling between CPU and GPU mode, the differences in rendering speed is notable, so GPU.js was definitely helpful in making tracing fast. I don’t think it would have been as cool if the ray tracer wasn’t fast enough to see the animations run smoothly. This has been an unexpected and unexpectedly fun assignment.
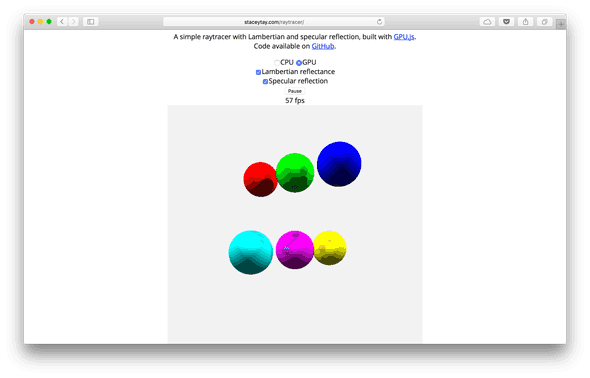
A screenshot of my ray tracer, at https://staceytay.github.io/raytracer/.
References
- Ray Tracing: Graphics for the Masses. https://www.cs.unc.edu/~rademach/xroads-RT/RTarticle.html.
- Raytracing. http://www.macwright.org/literate-raytracer/.


Hi! I’m Stacey. Welcome to my technical blog. Outside of computers, I also love brewing Japanese teas 🍵, reading fiction, and discovering random word origins.